
Are you looking for WebinarKit Review?
In this blog post, I’m going to share my experience of using WebinarKit software.
I will share everything you need to know about WebinarKit. I’ll reveal my own stats of webinar registration, conversion rate and much more.
WebinarKit Review
Final Verdict
We tested WebinatKit and we found WebinarKit software is good for beginners who are just starting out with automated webinar funnels. WebinarKit is loaded with so many features. WebinarKit pricing is affordable. The user interface is simple and clean. You can set up your automated webinars in less than 15 minutes. WebinarKit has an in-built video hosting system if you buy WebinarKit Pro (Upsell). They provide email support. Check out the WebinarKit Here!
WebinarKit Lifetime Deal
WebinarKit is offering a lifetime deal on automated webinars for just $497 (one-time fee). I’m using WebinarKit, and I can say it’s a mature software that’s worth the investment. You can try out their $1 trial before buying the software. Click Here to Sign Up!
What is WebinarKit Software?
WebinarKit helps you in creating like-live webinars. You can automate your highest-converting webinar and make profits on autopilot.
WebinarKit is trusted by over 15,000 businesses (they claim). WebinarKit is running ads on Facebook continuously. I get to see WebinarKit ads many times on Facebook.
With the help of WebinarKit, you can create unlimited automated webinars, make more passive income.
The best thing is, WebinarKit comes with a one-time price. That means, no need to pay recurring charges like EverWebinar, WebinarFule, and WebinarNinja.
But, there are some disadvantages you might face with WebinarKit. I’ll tell you in today’s WebinarKit review guide.
Let’s get started!
Things I like about WebinarKit
I have tested WebinarKit and created some automated webinars. In this guide, I will share the results that I’ve got using WebinarKit software.
Simple to use interface
In the past, I’ve used multiple automated webinar tools, but none of them were easy to use. It would take a lot of time to figure out even the simplest things.
However, with WebinarKit, it’s extremely easy to use, and you can set up everything in less than 10 minutes—even if you’re a complete beginner or not tech-savvy.
WebinarKit UX/UX is pretty simple and smooth. Unlike other automated webinar platforms, the user interface looks cluttered.
Pages load extremely fast
WebinarKit registration, thank you and webinar replay pages load blazing fast. WebinarKit supports almost every browser you can think of, be it Chrome (I use it), Safari, Brave, and many others.
Embeddable registration form on third-party sites
Don’t want to use the WebinarKit page editor? This feature allows you to embed registration forms on your website just like EverWebinar.
However, they have recently released this feature. So I tested but I didn’t like it. They could make the form a little better.
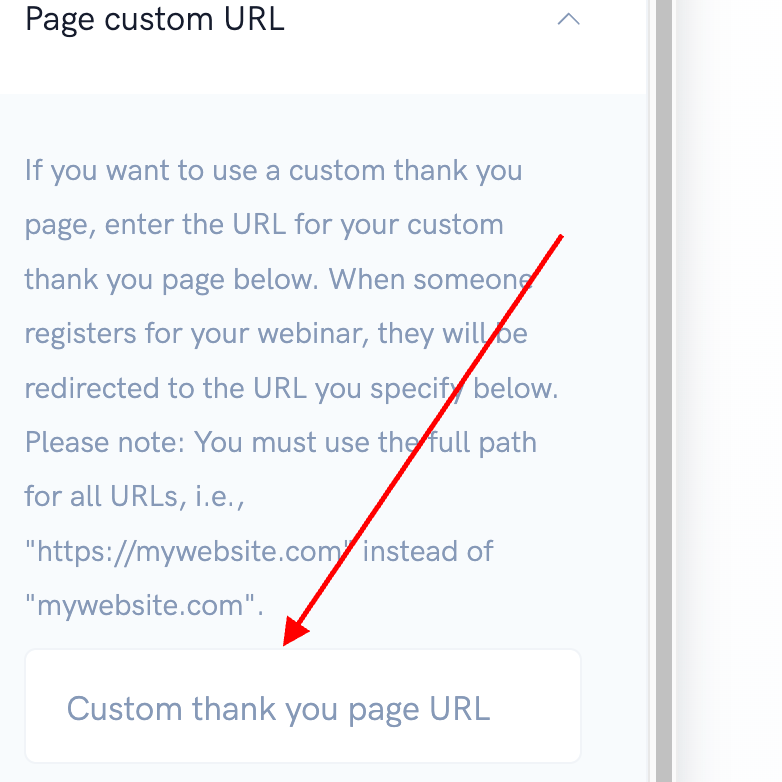
You can even redirect users to your custom thank-you page after they’ve registered using the embeddable form on your website.
You have the option to either redirect them to your own custom thank-you page or use WebinarKit’s default thank-you page after registration, which is really great.
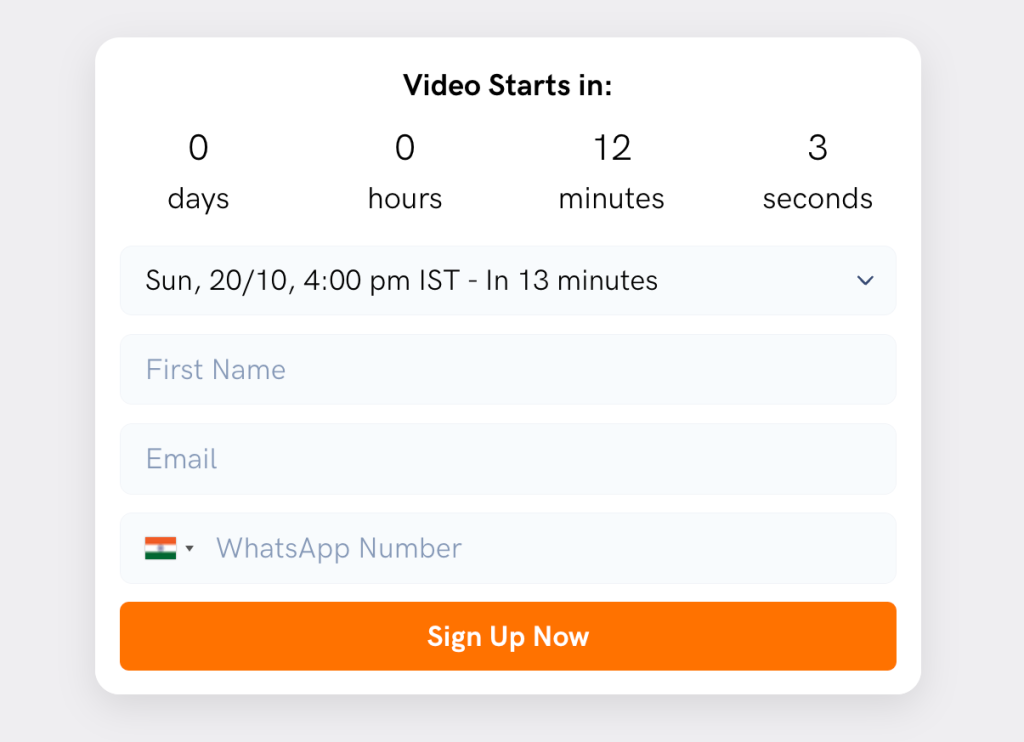
Even if you use your custom thank-you page, you still have the option to embed essential details like the link to the webinar room, the webinar start time, and the ability to share the event.
All these features make it a really great webinar tool.
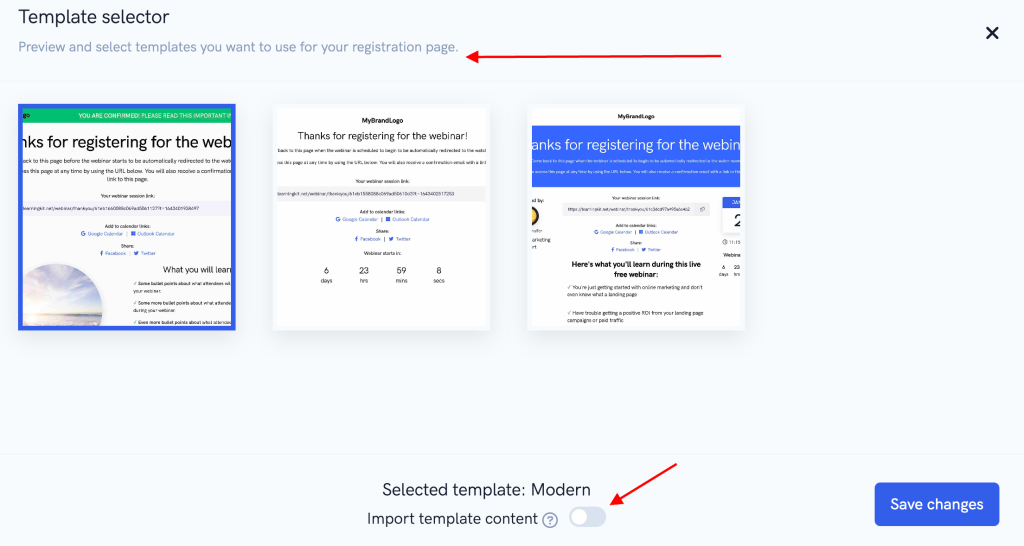
On top of that, you can import templates or choose from their pre-made thank you page templates.
WebinarKit host your videos on their server
Yes, you heard it right. WebinarKit supports third-party video hosting services like Vimeo Plus (not Vimeo Pro), AWS and YouTube.
NOTE: This feature is not available in the base plan (If you’re buying the WebinarKit lifetime deal). You have to purchase WebinarKit Pro to host your videos on their server. It’s worth the investment, it makes so much easier to upload your trainings.
Schedule your webinars
Webinarkit allows you to schedule your webinars. Let’s say, you want to run webinars every Saturday at 2:00 PM. Set the time and save it.
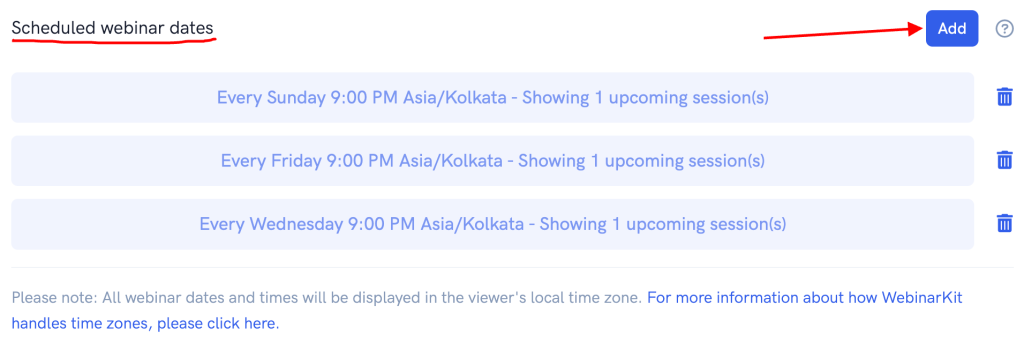
You can run just-in-time, daily, weekly, and monthly webinars.
Once it’s set up, it will keep running. But don’t forget to optimize your webinar funnel. If you just set it and forget it, you’ll lose a lot of money. I made this mistake, and I’m warning you.
Detailed analytics
WebinarKit provides detailed reporting on how many users saw your webinar, what’s the average view duration, etc.
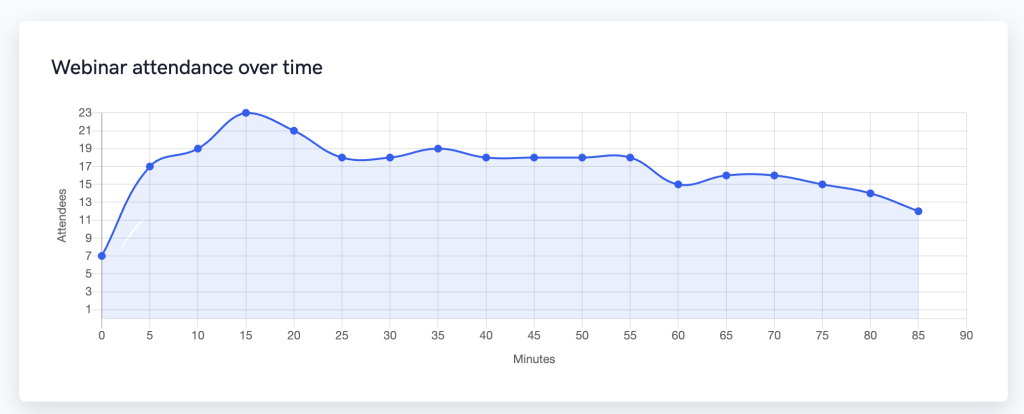
It’s super helpful for optimizing your webinar for maximum retention. You can view your analytics for the last 7 days, 14 days, 30 days, or any specific date range.
Tracking scripts
You can put Facebook Pixel and Google Analytics tracking code on WebinarKit registration, thank you, and replay pages. Later you can remarket them using Facebook or Google ads.
Deep integration with Zapier & Pabbly
WebinarKit integrates with Zapier, Pabbly & major autoresponders, and WebinarKit passes all the data. Earlier WebinarKit wasn’t passing essential data in Zapier.
I am glad WebinarKit is improving day by day! I have to change my reviews. 🙂
With deep integration, you can build advanced email automation and more!
Excellent automated email system
WebinarKit has an automated email system. When I purchased WebinarKit they didn’t have this functionality.
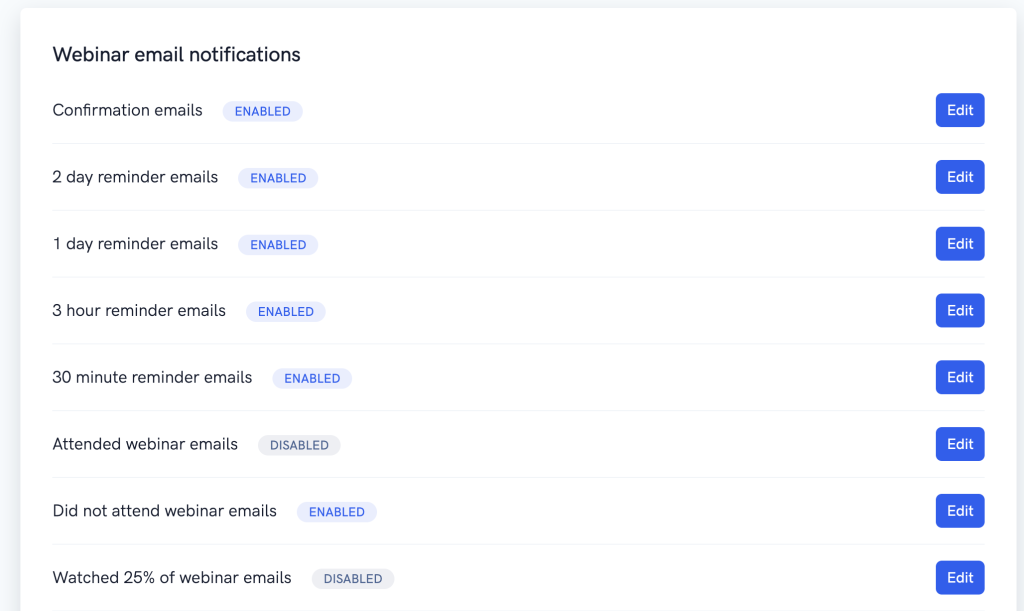
It’s good to see WebinarKit consistently pushing new updates, but WebinarKit’s automated email system is really GOOD.
You turn on different types of emails based on participants behaviour. You can set up emails in the pre & post-webinar sequence.
With WebinarKit, you can’t add emails beyond the pre-set triggers, while other tools like EverWebinar, WebinarFuel allows you to add unlimited emails.
You can edit the from email & name and reply to email. You can customize everything in the sequence.
WebinarKit offers 21 types of email triggers, which is a lot… So you based on your requirements, choose the correct email triggers.
WebinarKit now offers a feature-rich editor. Previously, the email editor was very simple and lacked formatting and customization features.
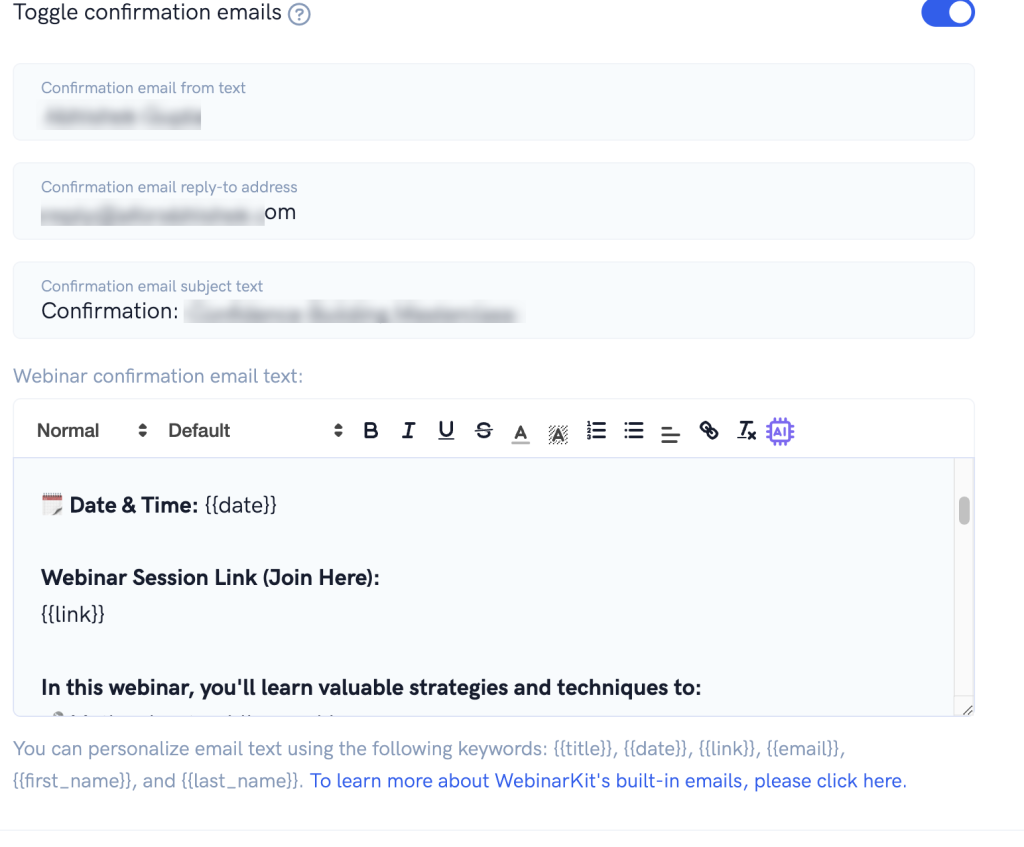
However, that’s no longer the case—you can highlight, bold, italicize, and do all sorts of things you’d do in a regular email autoresponder, which is great.
Plus, there’s no limit on how many emails you can send.
Customizable Webinar Room
WebinarKit is one of the first tools to offer the ability to customize your webinar room.
You can change the background, adjust the colors, and brand the entire webinar room according to your brand’s color scheme.
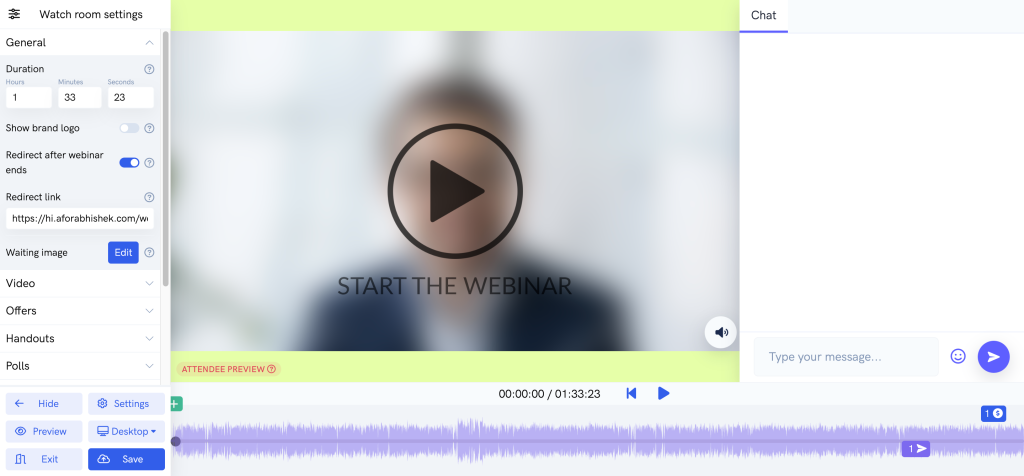
From the start thumbnail to automated chat, even down to the simple things like changing the text and button colors—everything can be customized to match your brand guidelines.
Advanced Page Editor
WebinarKit now offers an advanced page editor, which you can use to edit the registration, thank-you, and replay pages.
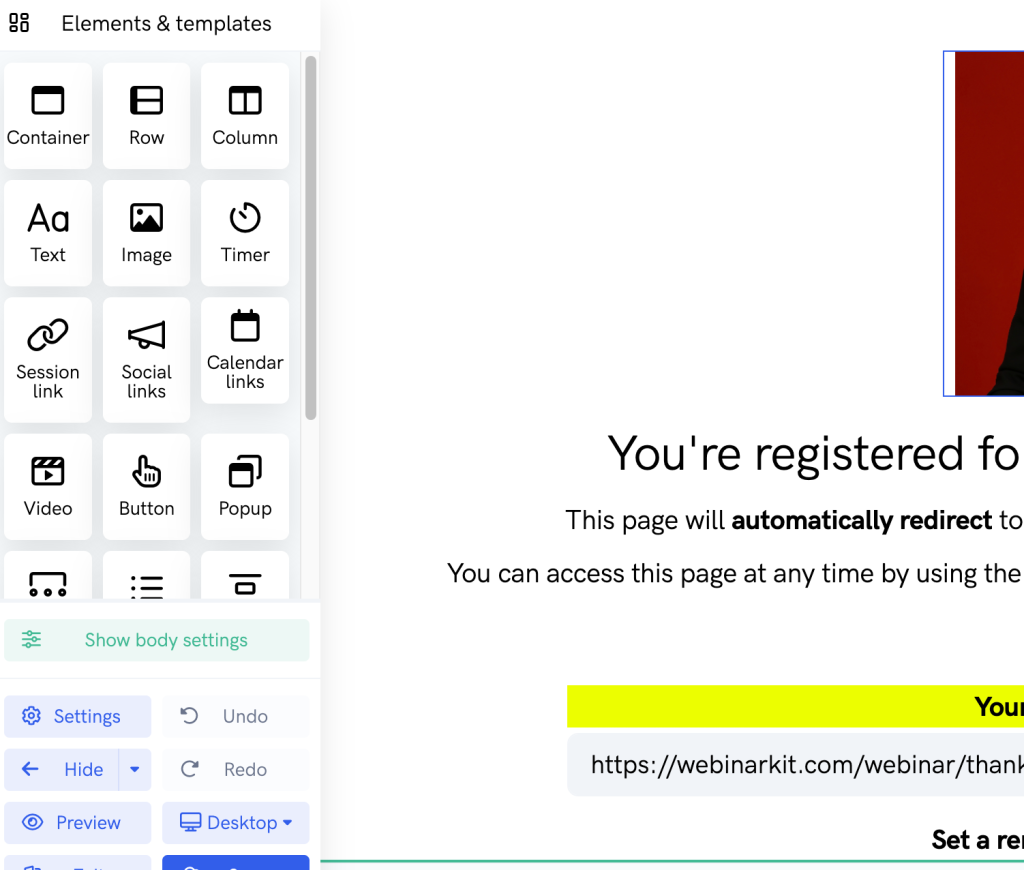
Earlier, the page editor was very simple with limited customization options, but now it provides a lot more flexibility.
You can even add HTML code and perform various customizations, similar to what you can do with a full-fledged landing page builder.
You can choose from templates or import custom templates from other designers, which can save a lot of time when designing your thank-you, registration, or replay pages.
If you don’t want to use the editor, you can simply use the embed feature to add the registration form to your website and customize everything there.
There are multiple options available—it’s up to you to decide what works best for you, and all the features function seamlessly.
Things I don’t like about WebinarKit
So far, I’ve talked about the good things about WebinarKit. But, there are a few things which I hate.
Here they are:
Too many add-ons! Why?
WebinarKit base plan is super affordable. Therefore, they have added so many add-ons. Right now, they have a total of 5 add-ons including WebinarKit live.
There are two essential add-ons without that you can’t use WebinarKit effectively. The upgrade is WebinarKit Pro.
I’ll explain WebinarKit upgrades later in this guide.
An Issue with Pabbly Connect Integration
Zapier is the most popular no-code integration platform. However, there’s now another option called Pabbly Connect.
Many people use it because it’s more affordable and works almost the same as Zapier.
However, with WebinarKit integration, there are a few differences. For example, if you’re running automated webinars, you need to manually enter the next upcoming webinar date when using Pabbly Connect.
In contrast, with Zapier integration, it automatically fetches the upcoming webinar date, so you don’t have to enter it manually.
The system will automatically update once the current webinar date is over.

I contacted support about this issue, but they didn’t offer much help. This becomes a significant problem if you’re running automated webinars and using Pabbly Connect to transfer data between applications.
You have to manually enter or update the date, which increases the risk of human error. If the WebinarKit team is reading this,
I highly recommend updating the Pabbly Connect integration.
It would help a lot of users.
WebinarKit Review Video
Pricing of WebinarKit: How Much Does it Cost?
WebinarKit is no longer a cheap software. However, it is easy to use and one of the best software options to host and run your webinars. Plus, the WebinarKit team is consistently releasing new features.
Additionally, the WebinarKit team honored the LTD users by offering all the new features to lifetime deal users as well. I appreciate the team for this.
The founders are active in the Facebook groups, which I really like.
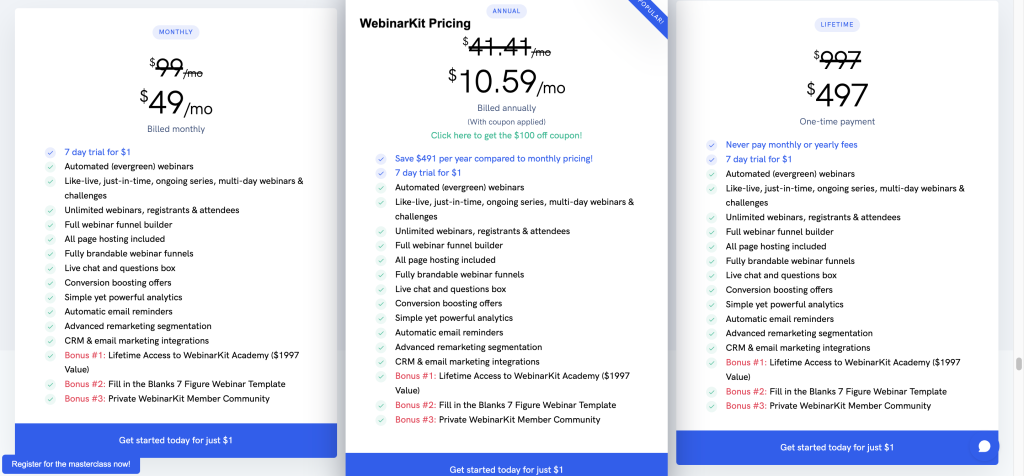
Currently, WebinarKit pricing is $49/month or $128/year or $497 one-time payment. (Pricing is subject to change, however, at this time of writing WebinarKit review, WebinarKit LTD costs $497).
If you don’t want to spend upfront $497, then WebinarKit monthly or yearly plan would be suitable for you.
Plus, you must have WebinarKit add-ons to use the software effectively.
Here’s what you’ll get with WebinarKit Lifetime deal:
- Automated (evergreen) webinars
- Like-live, just-in-time, ongoing series webinars
- Unlimited webinars, registrants & attendees
- Full webinar funnel builder
- All page hosting included
- Fully brandable webinar funnels
- Live chat and questions box
- Conversion boosting offers
- Simple yet powerful analytic
- Automatic email reminders
- Advanced remarketing segmentation
- Autoresponder integrations
WebinarKit is a mature tool now. You can pay $497 one-time or $49/month or $128/year and you’ll get unlimited automated webinars and attendees.
Is WebinarKit worth it?
Yes. Even if you’re advanced users who want to build deep webinar funnel. WebinarKit can be a good option for you.
However, there are certain things you’ll have to consider:
- If you are looking to use WebinarKit for a live webinar, you can do that since they provide the option. However, I don’t think it’s the best choice, as Zoom is much better in terms of live performance. But if you want to run automated webinars, WebinarKit is one of the best software options out there. You can go with this tool without a doubt.
- If you want to regularly use webinars to build trust and drive conversions, I would recommend getting the lifetime deal. This way, you can avoid paying a monthly or yearly subscription in the long run. Although the lifetime deal is a bit expensive, it’s an investment. If your existing webinars are already driving conversions, you can easily recover the $497 investment. It’s not a big deal, and it’s for a lifetime. You can use it for three, four years, or maybe even longer as long as the platform exists.
- If you’re not sure whether you’ll use webinars consistently and are just testing the water, then go for the yearly plan. It costs around $128 per year.
Overall it’s good software for beginners, and if you have a tight budget for marketing. You can go with WebinarKit.
What’s inside WebinarKit?
In this section, I’ll be explaining the different features that WebinarKit offers.
Things you’ll see in the WebinarKit dashboard.
WebinarKit dashboard is super simple.
When you log in inside the WebinarKit, you see all of your webinars. A filter for active and inactive webinars. Besides that, there’s a button for creating new webinars.
In the header of the dashboard, there’s a help center link, affiliate program and a menu bar.
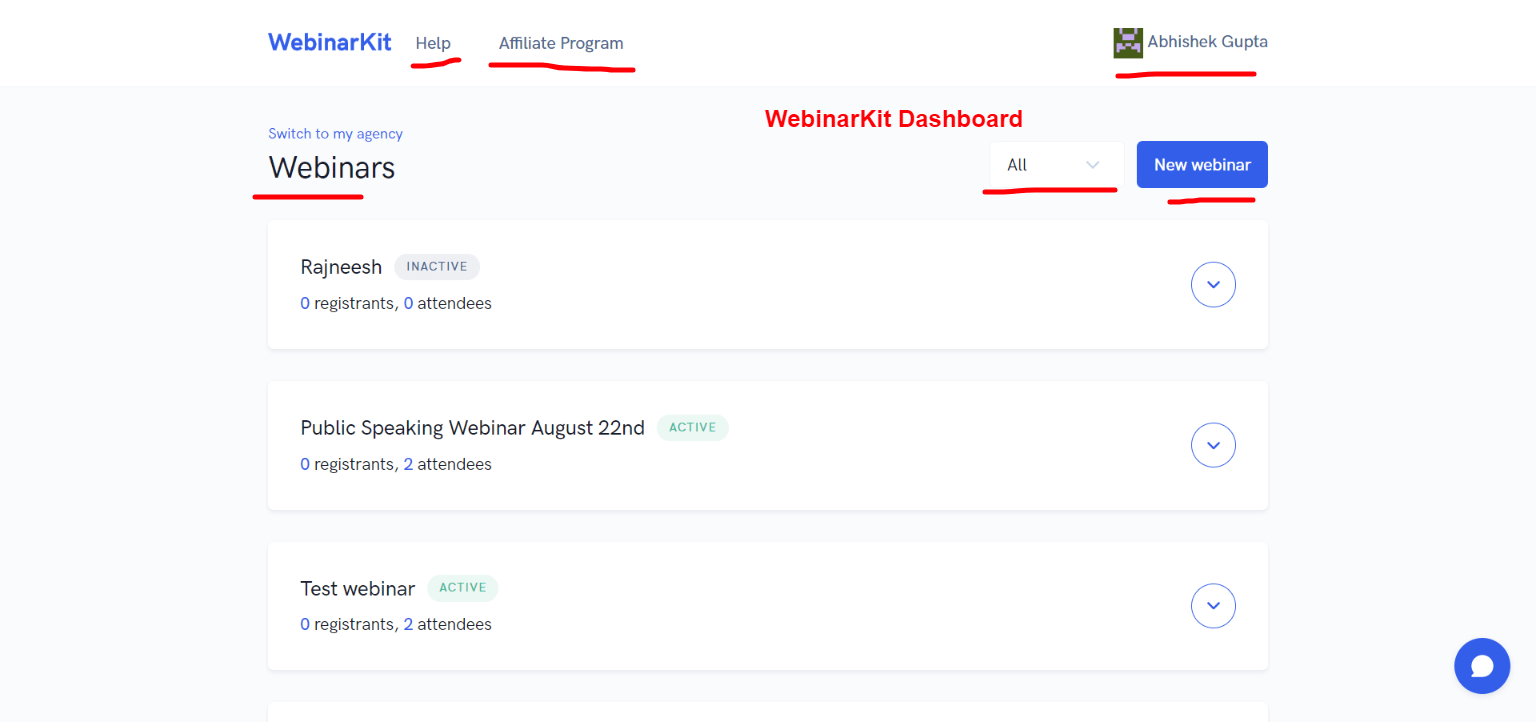
Menu bar has a dashboard, media, settings and sign out option. Super basic!

In the media section, you can find all the uploaded videos if you have bought WebinarKit pro.
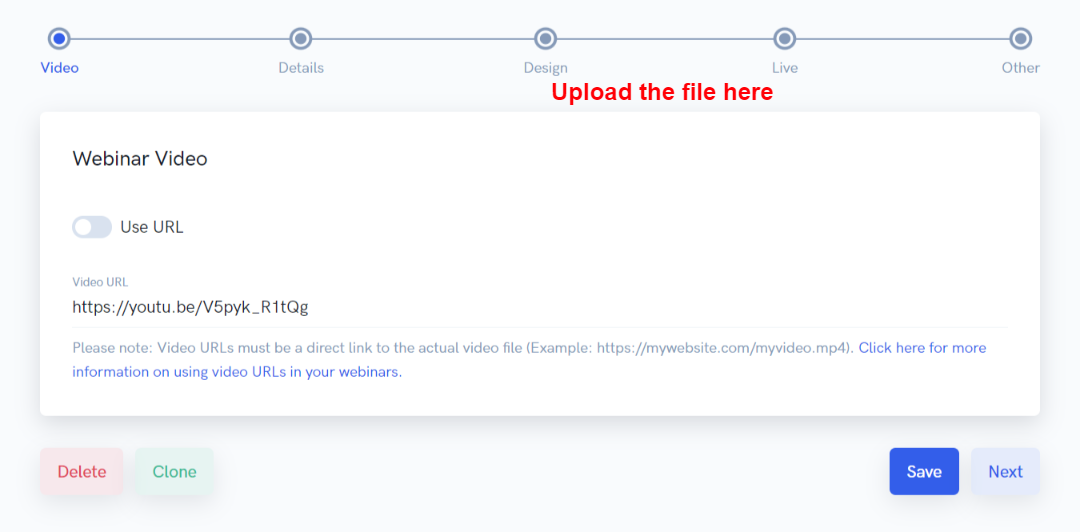
Webinar Details
To create a new webinar, click the “New Webinar” button. Then you have to choose the file/video that you want to use for the automated webinar.
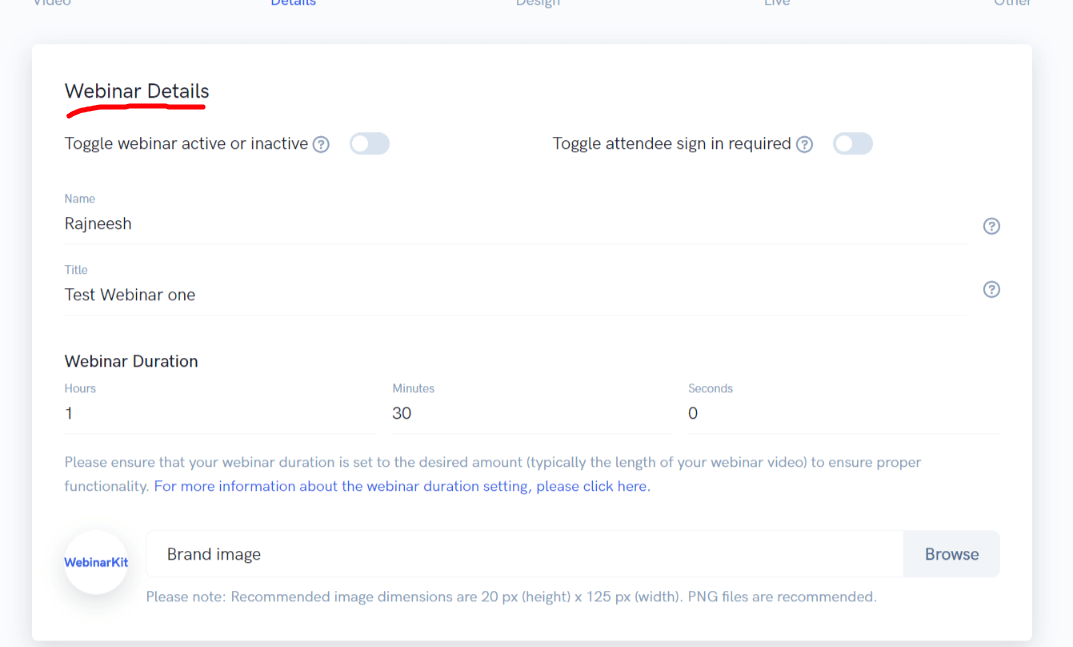
Then, in the “Details” section,
- Name your webinar (for internal purposes), write the webinar title
- Set the webinar duration
- Upload a brand image (optional)
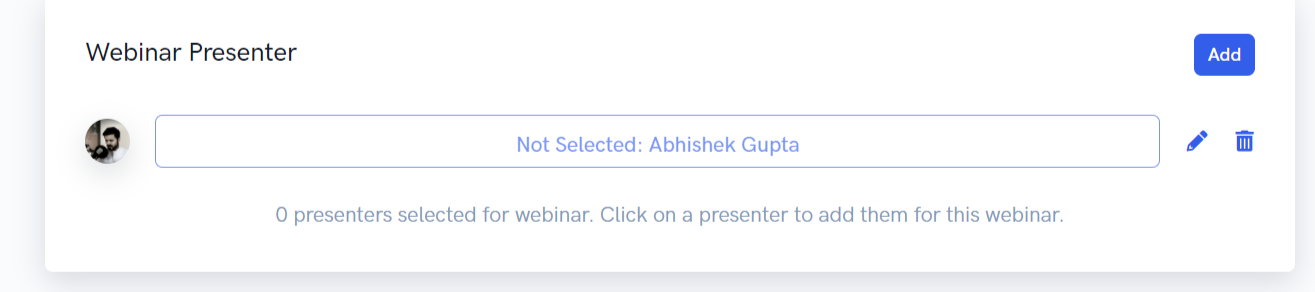
Webinar Presenter
Here you can add the basic details about the webinar host. You can even create a new webinar host.
Schedule your webinar
Choose when you want your automated webinars to run. Choose the right time zone. It’s super important. Make sure you do it properly.
You can run your webinars every 15 minutes or a specific time of the day or just on any specific day. You can set up all the things here. Once you’re done, hit save and click Next.
Build registration, thank you, and replay pages
Now, you have to build the three basic registration pages, a thank you page and a replay page. It’s super simple. All you have to do is change the text, colors and add the necessary details, hit save.
Webinar settings
Inside Webinar LIVE settings, you can control whether you want to show the email questions box or not.
Choose whether you want Webinar chat enabled or disabled.
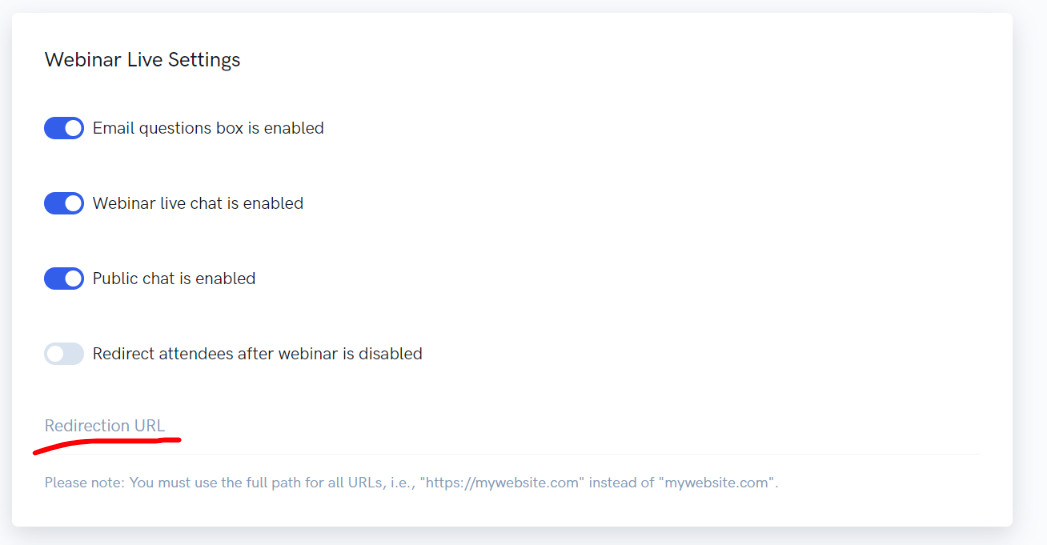
You can even redirect your attendees once the webinar is over.
Webinar Offer Settings
Here you have to give the details about the course/product you’re selling.
Give your offer,
- A headline
- Description
- Pricing
- Set the offer call to action 1
- Offer link 1 (put in the checkout link)
You can put up to 3 calls to action.

Set the time when you want your offers to show up. Choose the offer start time and end time.
For scarcity, you can toggle on “Offer webinar countdown.”
Webinar Poll Settings
If you want to run a poll during the webinar, click on the “Add poll” button.
- Give the poll title, question
- Set the poll start time and end time in minutes and seconds
- Add poll option
Hit the “Add poll” button.
Webinar Handout Settings
If you have promised something at the beginning of your automated webinar, you can provide that thing here.
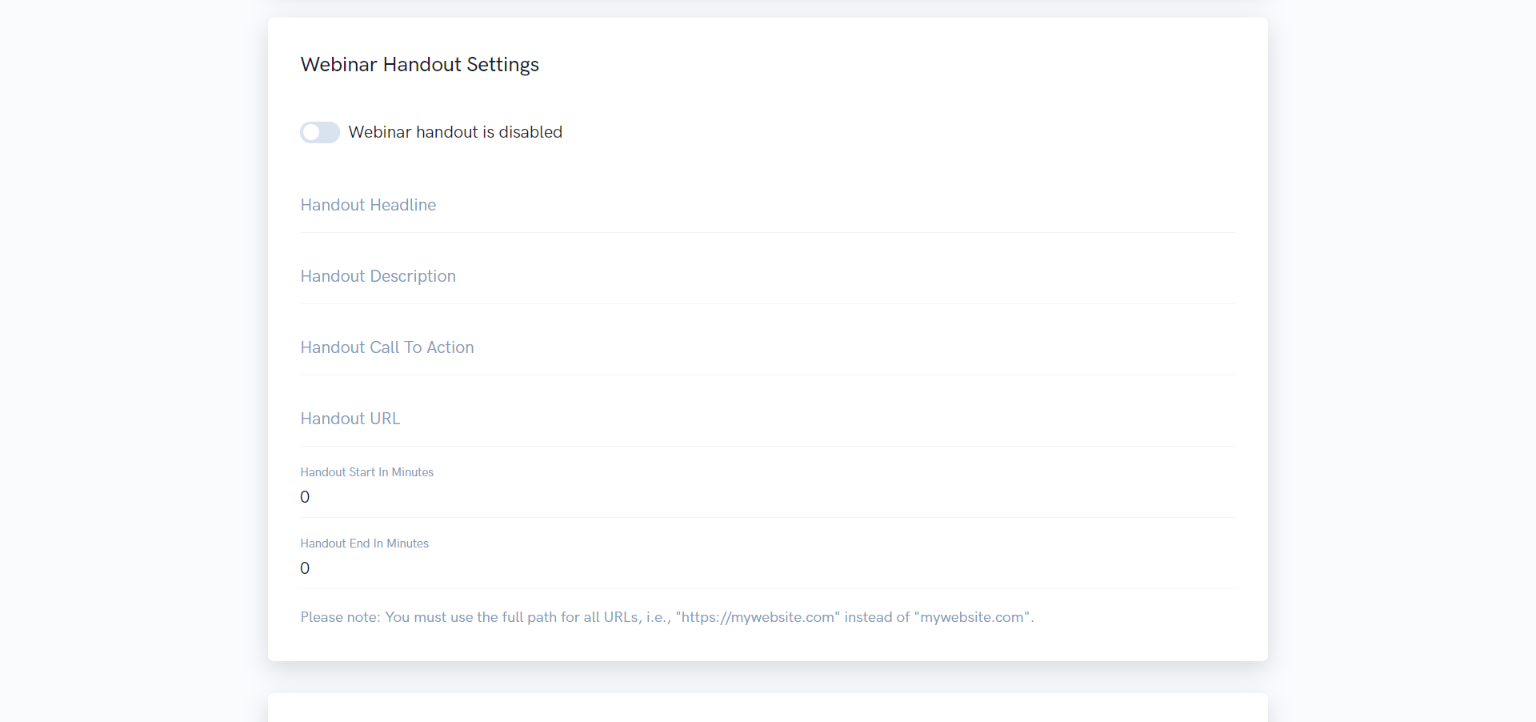
Provide all the details such as headline, description, call to action, URL start and end time.
If you toggle off this section if you don’t have anything to give. 🙂
Webinar Chat Simulator
If you have bought their chat simulator add-on, you’ll see this option too. Personally, I don’t like to add fake chats. But if you want to make your automated webinar like a real one you can use Webinar Chat Simulator.
Webinar Label Customization Settings
Here you can name all the fields as per your requirement. I don’t think you would need to customize labels.
Email/Webinar notifications
It’s the final step of the automated webinar funnel setup.
Set the email webinar notifications. You can change the sender name, email title and copy. WebinarKit email editor is also simple, you can add only text and links.
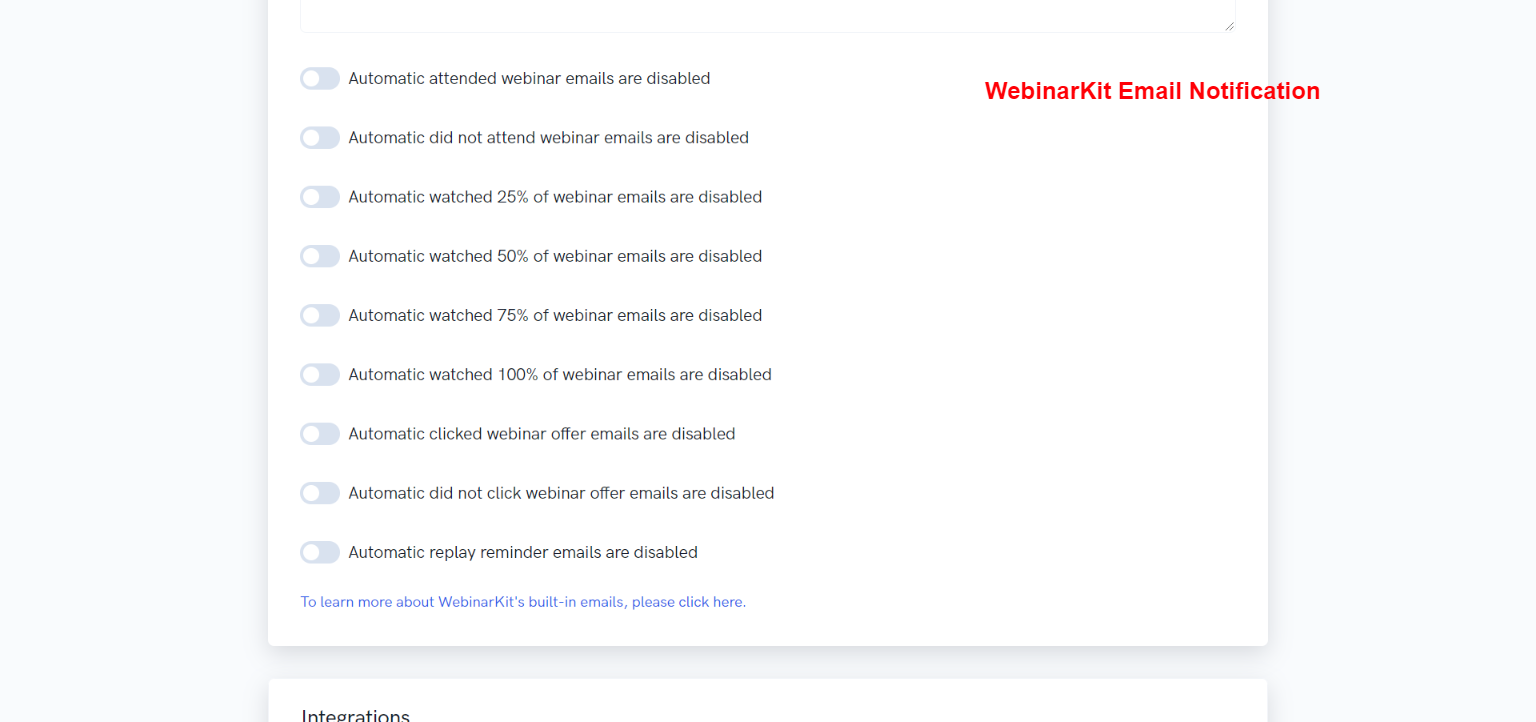
WebinarKit has a limited number of email reminders. All you need do is write the emails and toggle on each email that you want to send.
For beginners, it’s very useful. As you don’t have to manually set each email and when it’ll be sent out.
I feel WebinarKit email reminders are too basic for advanced users like me.
Set up your scripts
You can place scripts on different pages such as registration, thank you, and replay pages.
If you have a Google tracking id or Facebook pixel, place it on your pages.
WebinarKit Integrations
WebinarKit integrates with major autoresponders.
Here’s is the list:
- ActiveCampaign
- Aweber
- ConstantContact
- ConvertKit
- Drip
- Getresponse
- MailChimp
- MailerLite
- SendFox
- SendInBlue
- Sendlane
- Zapier (automation tool that connects multiple apps without code)
- Pabbly Connect
As you can see WebinarKit has almost every autoresponder integrated. All the integrations are super basic. You can just pass the data (name, email and phone number) from WebinarKit to your autoresponder.
Build Automated Webinars in less than 10 minutes?
Build automated webinars in just 5 simple steps.
Step 1: Upload the video file
Step 2: Provide the Webinar details
Step 3: Set up the essential pages like registration, thank you and replay pages
Step 4: Set your offer details like title, description, call to action and handouts.
Step 5: Set up follow up emails and tracking script
Done. Your webinar is ready to convert visitors into customers 24×7.
Webinar Analytics
Once your automated webinar is live. You can view the analytics.
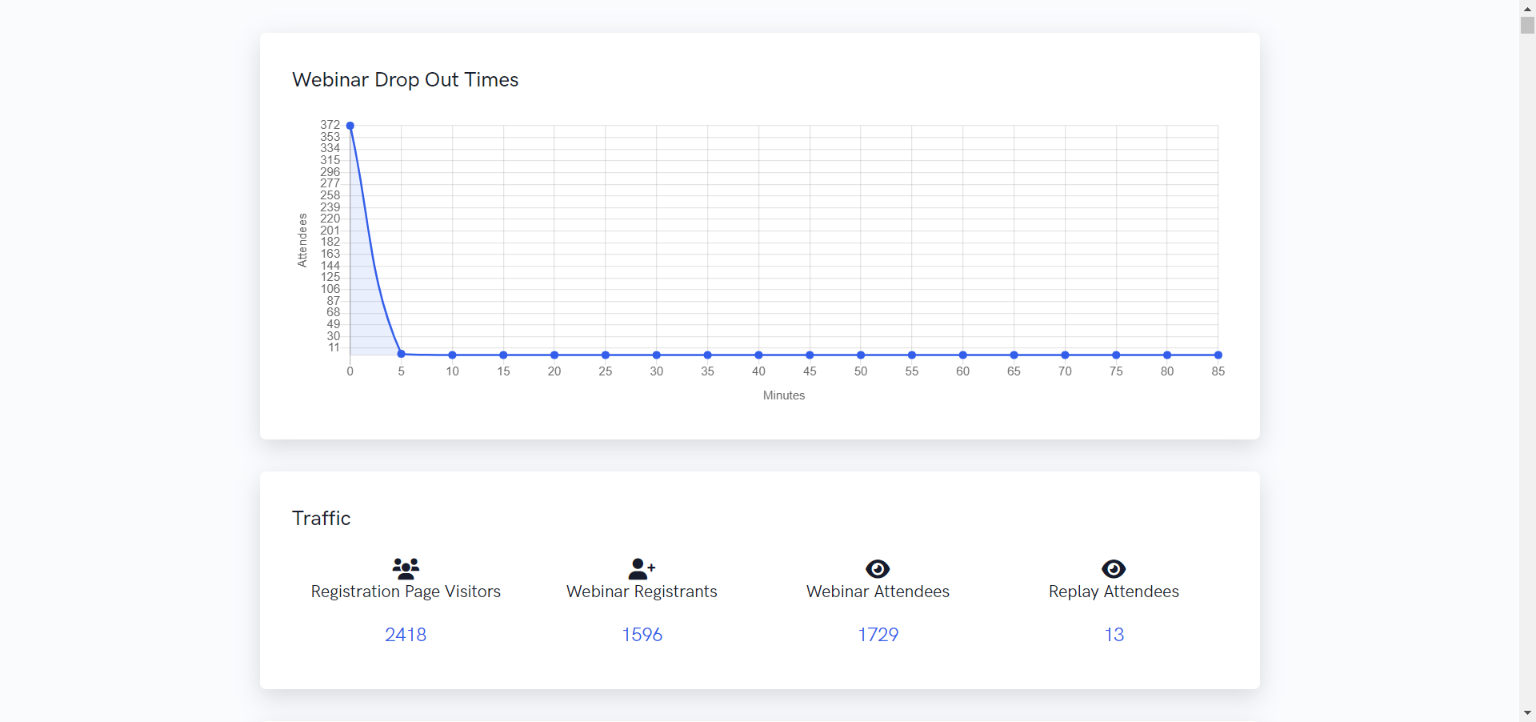
Inside Analytics, you can see the following things:
- Webinar dropout times
- Traffic – how many people came to the registration page, how many of them signed up, how many attended the webinar and replay.
- You can see the conversion rate of the registration page, webinar attendance rate and replay attendance rate.
- Engagement – This is super important. You can track what’s the average time users spend on the webinar and replay. That’ll help you to optimize the webinar for higher engagement.
- Track how many people clicked on your Offer in the webinar and replay
- You can see webinar registrants’ details such as name, email, phone number and status of the registrant such as webinar attended or not, webinar view percentage, offer clicked and webinar registration date and more.
- You can export “Registrants details” in CSV format.
Do I need to pay extra for any add-ons?
Yes, you’ll have to pay extra for add-ons. As I said at the beginning of this post, WebinarKit has too many upsells/add-ons.
Here I’ll briefly mention all the WebinarKit add-ons. 🙂 Let’s begin!
To buy WebinarKit pro, you must first own WebinarKit.
WebinarKit is priced at $947 one-time payment or $49.49/month. During a special offer, you can see a reduction in price.
Here’s what you’ll get with WebinarKit Pro:
- Built-in video hosting
- Engagement boosting polls
- Registration page templates
- Embeddable registration forms
- One-click replay pages
- Automated handouts
WebinarKit comes with a 14-day money-back guarantee. If you don’t feel like WebinarKit is value for money, you can ask for a refund within 14 days.
In my opinion, WebinarKit pro is worth every penny because of two reasons:
- In-built hosting
- Embeddable registration forms
- Supercharge engagement
- Automate your chatbox
- Drive more sales
- Create a “live” experience
- Sell on autopilot
- Boost attendee satisfaction
When I started using WebinarKit they did not have any feature to go live. Now, they’ve made the platform better.
Here’s what you get with WebinarKit live:
- WebinarKit Live Upgrade
- Unlimited LIVE webinars
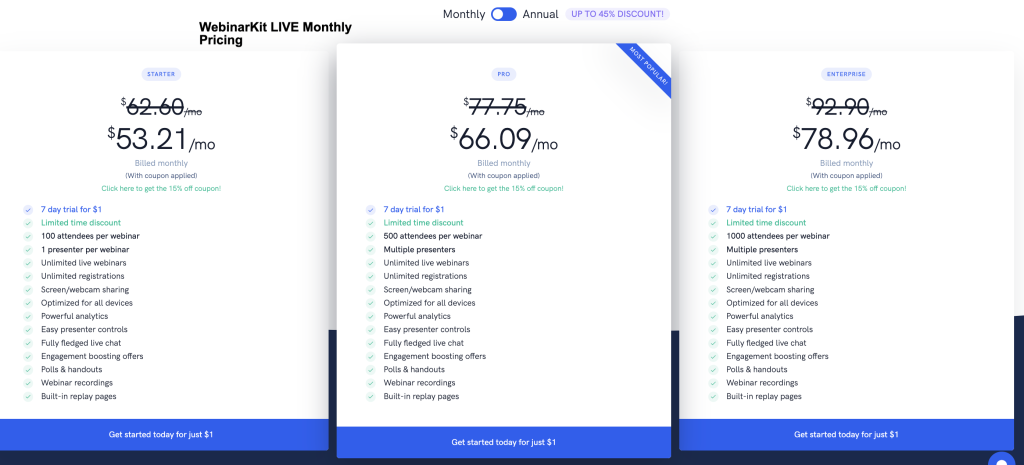
- Lowest founder’s Monthly/Yearly Pricing
- Unlimited support
WebinarKit LIVE plan starts $53.21/month. I wrote a detailed article on WebinarKit Live pricing. Click here to read.
If you are looking to use WebinarKit for clients, then you might consider getting the WebinarKit white label plan.
This allows you to rebrand the WebinarKit software as your own and offer webinar services under your company’s name, charging clients accordingly.
Additionally, you can host live webinars for up to 500 attendees at a time, plus you get the automated webinar features and other benefits.
It’s a worthwhile investment, but it depends on the kind of use case you have.
What you get with WebinarKit Whitelable:
- 100% white label with 1 custom domain included
- 1 main account loaded with 25 subaccounts
- Unlimited automated webinars per account
- Unlimited live webinars up to 500 attendees per account
WebinarKit Whitelable basic plan costs $197/month, and if you go with an annual plan, then the basic plan will cost you $166.42/month.
WebinarKit Custom Domain
It’s weird that WebinarKit will charge you $13.33/month (If you buy an annual package) else it will cost you $16/month just for a custom domain.
I mean who will pay monthly charges just for a custom domain. It’s crazy!
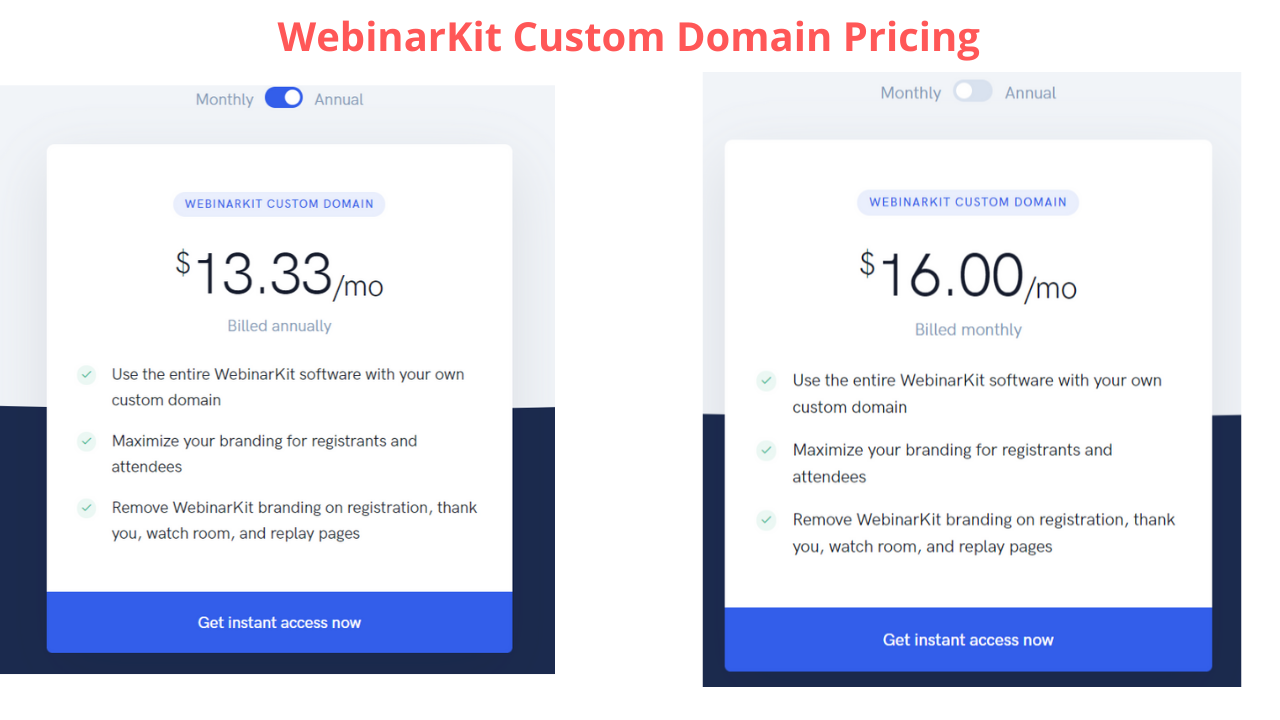
Here’s what you get with WebinarKit Custom Domain:
- Use the entire WebinarKit software with your own custom domain
- Maximize your branding for registrants and attendees
- Remove WebinarKit branding on registration, thank you, watch room, and replay pages
Frequently Asked Questions about WebinarKit Software
What is WebinarKit?
WebinatKit allows you to build automated webinar funnels that feel like a live webinar. Additionally, you can go live using WebinarKit if you purchase their add-ons. In this post, we have talked about the WebinarKit pricing plan, upsells, and how to build automated webinars.
Does WebinarKit work on all devices and browsers?
Yes, I have personally tested WebinarKit in Chrome browser and firefox. WebinarKit pages loaded smoothly.
How do I get started with WebinarKit?
First, you have to sign up for WebinarKit. Click here to Sign up for the WebinarKit.
What is the best way to create a registration page using WebinarKit?
Creating registration pages is super easy. Change the text, and colors, add the essential information.
Who is Stefan Ciancio?
A former mechanical engineer, I found myself yearning for a life of more freedom. I fired my boss in 2015 and began working for myself.
I went from struggling to sell courses, coaching, agency services and software to selling 7 figures worth thanks to the power of webinars. Webinars transformed my business, so I wanted to figure out how I could help it transform other businesses as well… and soon, I co-founded WebinarKit with a friend who had the same vision… to create an all in one tool that lets others transform their businesses through webinars.
Now I run WebinarKit, and help others explore their own business with webinars too!
Credit: https://stefanciancio.com/
My experience with WebinarKit software
Initially when I heard about WebinarKit. I was excited about it. I built a funnel and sent a broadcast to our email list and we got 3 sales. 🙂
It was a good experience using WebinarKit. Though, now we have more advanced requirements so we’re not using WebinarKit anymore.
What are the benefits of automated webinar funnels?
There are many advantages of having an automated webinar funnel in your business.
- You’ll make consistent sales.
- You can focus on other important things that matter to you.
- You’re adding value in people’s lives and making profits too.
- Automated webinar funnels don’t require any human intervention once it’s live.
The automated webinar is a win-win situation for everyone.
Conclusion
WebinarKit is a very stable software and comes with an intuitive user interface that allows you to build automated webinars in minutes.
In today’s WebinarKit review, we discussed the following things:
- What’s WebinarKit?
- Pros and cons of WebinarKit
- Pricing of WebinarKit
- Add-ons of WebinarKit
We also discussed WebinarKit Live and WebinarKit Live Agency.
WebinarKit live costs you monthly charges. I have explained about WebinarKit custom domain as well and its pricing.
I hope you found this WebinarKit review useful. If you liked this post feel free to share your thoughts in the comments below!
WebinarKit Lifetime Deal
WebinarKit is offering a lifetime deal on automated webinars for just $497 (one-time fee). I’m using WebinarKit, and I can say it’s a mature software that’s worth the investment. You can try out their $1 trial before buying the software. Click Here to Sign Up!
If you have got questions? Let me know in the comments, I’ll answer.
My latest blog post, you can read here!
I would not recommend Webinarkit because of my experience with them.
I purchased the Lifetime Regular with the 30 day-Refund No questions asked in 2021, and after 3 days, I decided it was not what I wanted. So I requested for the refund. However, one of their customer service guys, Andrew Yang offered me the Lifetime Pro if I continued. I agreed, and he upgraded.
Since then and until June 2023, I did not use it as I had no time, busy with my three companies. In June 2023, I tried to log in but could not. I asked them why; and this guy named Martin apologized – apparently they had deactivated my account. IMAGINE THAT? THEY DEACTIVATED your account DESPITE THE FACT YOU HAVE PAID FOR THEIR PRODUCT!!!
And then, I said my account is actually the Lifetime Pro, and not Lifetime Regular. They ignored me. In fact, they kept replying with, please send us the invoice for this purchase, although I have – many times – forwarded them the email conversation between me and their official email account. Last, they then did a last email saying, As they have not received anymore emails from me, they will close this email conversation.
This despite the fact I kept sending them emails forward of the Andrew Yang and my conversations.
Now; they couldn’t have not gotten my emails because they got them when I first asked them why my account did not exist (of which they replied and informed me they have reactivated my account).
I have email proof if anyone wants to see them.
How dishonest and disgusting is their behaviour; if they didn’t want to honour their upgrade – first tell me, and then either offer me the refund.
Not pretend that they haven’t gotten my emails. Is this the kind of people you want to deal with?
DO NOT DEAL WITH THEM.
You are welcome to ask me any question, I will share and show you my experience. I’m not going to use their product because I DO NOT trust them with my materials. I advice you not to.
Webinarkit; if you’re seeing this, you are welcome to get in touch.
Sorry to hear this. I also bought their LID in initially days. I bought all their upsells and I nenver faced any issue so far. My account is up and running. Of course, here and there some issues occure but their support team help. I am in WebinarKit community too. They’re genuine company. I am sorry to hear about your experince. But my experince with WebinarKit is good. I guess, they offer 14-day money back guarantee. Maybe that could be the reason why they didn’t want to refund. Anyway, Are you using WebinarKit right now? NO?
You can check out these 7 Webinar Platforms:
http://magicblogging.com/best-webinar-platforms/
Always happy to help!
I could have deleted this comment but I don’t want to hide anything from my readers. If you’re reading this, there is a 1% chance, you might face issues like Emil. Again, I would say, my experince is good with WebinarKit.
Hi Rajneesh,
While most of the SaaS companies are selling Webinar tools on a monthly recurring plans, WebinarKit one time pricing deal is definitely to steal before it goes.
The article was worth giving a read, thanks!
Yes, you’re right!
So do you have a recommendation for software for one hosting several modules on their webinar (with 4 videos and 4 packet uploads?) Can one upload this onto this software or is it just one video and one packet? Thanks!
And is there a one time charge for the whole kitten and caboodle or is it still a monthly charge after you pay for the first parts? Thanks!
Hi Lisa,
You can upload multiple files/videos into this software. And, WebinarKit charges a one-time fee for hosting files on their server. When you buy WebinarKit Pro, you’ll be able to upload videos into the software.
Hope this helps!
Let me know if you have more questions!